Sunday 17 November 2013

Carrot cupcakes with vanilla cream cheese frosting

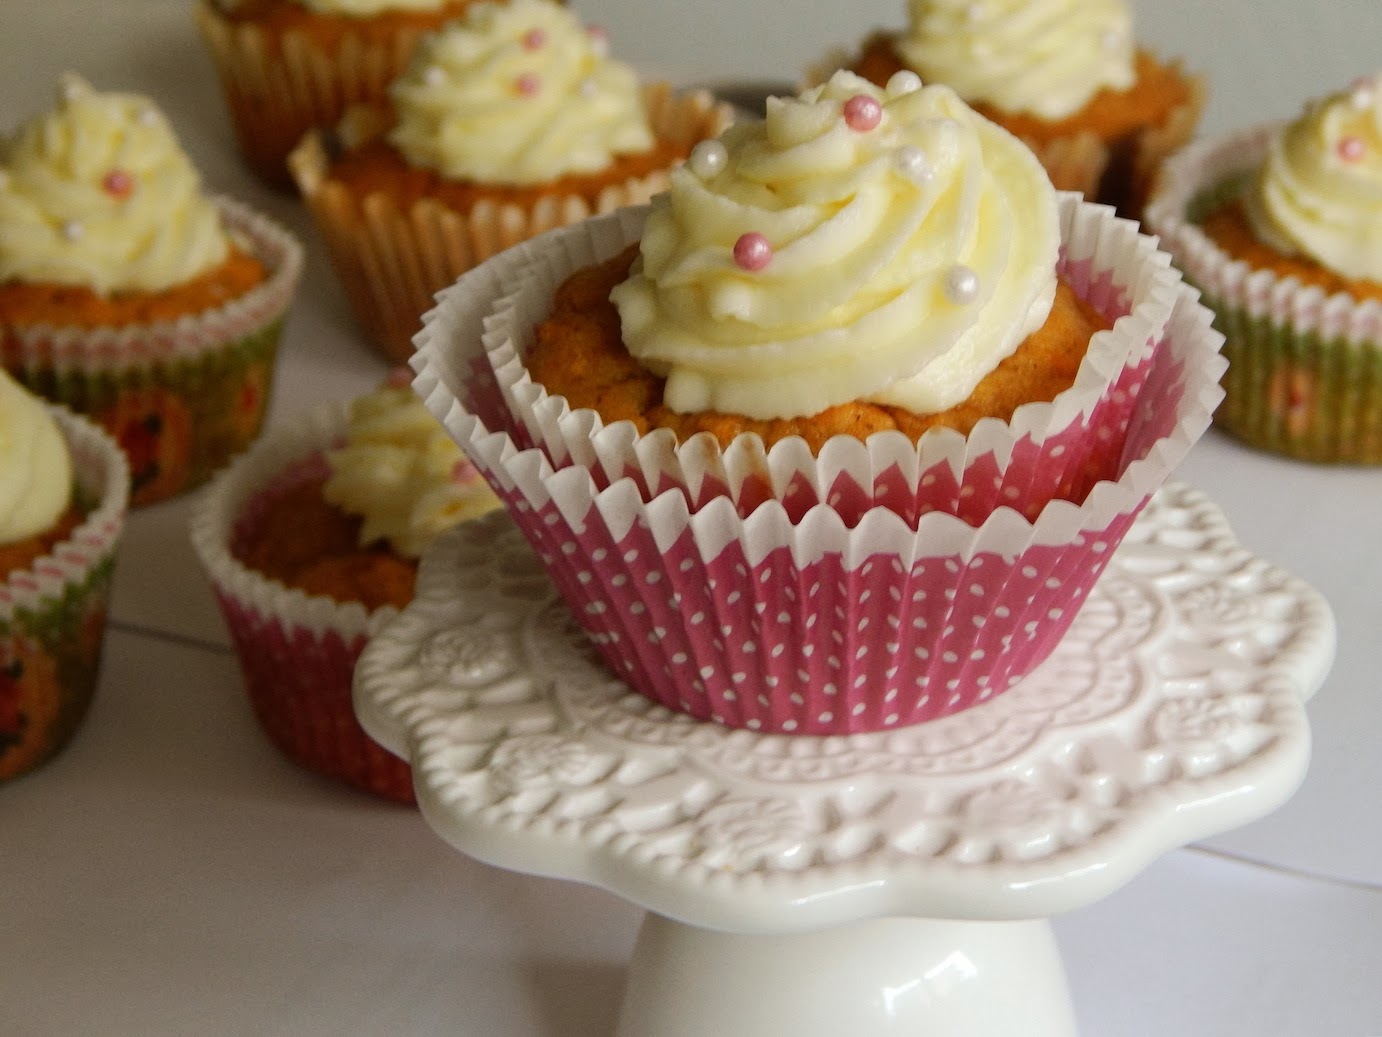
If you are also crazy for carrot cakes like me, you must try these easy cupcakes for yourself! They are very easy to make just few whisks and you are done!! You will see you will love the soft, moist and tender texture finished with a perfect touch of a vanilla cream cheese frosting!! Yummy!!

Ingredients:

For the cupcakes:
  • 350g flour 
  • 120g caster sugar
  • 150ml buttermilk or normal milk
  • 1 egg, lightly beaten
  • 150 g butter, melted
  • 150g brown sugar
  • 1 teaspoon mixed spice 
  • 3 grated carrots
  • 1 teaspoon vanilla extract or 1package vanilla sugar (16g)
  • pinch of salt
  • 1 teaspoon baking powder
  • 1/2 teaspoon baking soda
  • 100g hopped walnuts - optional 
  • 100g raisins - optional
For the frosting
  • 250g cream cheese (I used mascarpone)
  • 1/2 cup powder sugar
  • 16 gr vanilla sugar
  • 50g butter, soft
  • optional - you can add some food coloring to get a colorful frosting, like i did to make the roses :)
Preparation

Preheat the oven to 180°CLine a 12-cup standard muffin tin with paper liners. 
In a mixing bowl combine flour, baking powder and soda, caster sugar, brown sugar, mixed spice, carrots, walnuts and raisins. Add milk, egg and melted butter. Mix until just combined, but doesn't have to be too precise. With a spoon scoop evenly into the prepared cupcake liners. Remember to fill the muffin cases only 3/4 cavity otherwise they might overflow. You might have some mixture for the 13th and 15th cupcake, depending on the measures of your cupcake tin. Bake for about 20min and leave to cool down. 
For the frosting: With a mixer, beat together cream cheese and butter when it combines add sugars and beat until combined and smooth. Frost the cooled cupcakes as desired. I piped them with a piping bag but you can do it with a spoon it will be equally tasteful! 


Tuesday 5 November 2013

Yeast croissants with a plum marmalade filling


This are definitely flavors from my childhood... I loved to spend time with my mum in the kitchen and we used to bake those little bites very often. We always used a homemade plum marmalade that was previously prepared by my mum, and of course I couldn't do diffrently in this recipe ;-) 

Ingredients: 
(approx. 50 croissants)

  • 500g flour
  • 100g sugar
  • 150g margaryny 
  • 1 egg + 1egg to lubricate
  • 42g yeast
  • 60 ml milk
  • pinch of salt
For the filling: 
I used 1 small jar of a plum marmalade and 1 box of ricotta (200g ricotta mix with 3 tablespoons of powder sugar and 1 package of vanilla sugar or vanilla essence)

But you can fill your croissants with any filling you like!! You can use Nutella, or simply a peace of chocolate, any kind of marmalade or pudding...up to your imagination!!! 

Preparation:

Preheat the oven to 200ºC. Melt butter and leave to cool down. Heat the milk a bit up, add sugar and mix it with the yeast. Leave for 15min to rest and to let the yeast work. 
To a mixing bowl pour flover, salt, egg, melted butter and milk and stir untill all ingredients combine, you will probably need to work with your hand to get a smooth dough. Cover the bowl with a tea-towel and leave in a warm place for approx 30min to let it grow. 
Take your dough out of the bowl and divide in 2 peaces (or more if it is more handy). Each peace roll in a circle and then divide in triangles. On the border of each triangle put some marmalade and roll the triangles forming croissants. Remember to put the peak of the triangle underneath each croissant so that they don't open while baking. Place them on a baking tin. Beat the remaining egg and now lubricate each croissant with it, this will make your croissants shiny :)  
Bake approx 15min, when you notice them getting a nice golden color this will mean they are ready! YUM!!! 


Wednesday 30 October 2013

Chewy and delicate peanut butter cookies


Who doesn't like peanut butter?? I think I don't know anyone! And of course I am one of the peanut butter lovers :) If you also like peanut butter then this recipe should be on your list! Super delicate, soft and chewy inside, just perfect peanut butter cookies!!! 

Ingredients:
  • 110g butter, softened
  • 200g peanut butter
  • 150g white sugar
  • 100g brown sugar
  • 1 egg
  • 1 tablespoon milk
  • 1 package of vanilla sugar (16g)
  • 170g of flour
  • 3/4 teaspoon baking soda
  • 1/2 teaspoon baking powder
  • 50g chopped white chocolate - optional 
Preparation:

Preheat the oven to 180ºC.  In a mixing bowl beat together butter and peanut butter. Add sugars and beat until combined. Add egg, milk and mix again until everything combines. Add flour, baking soda, baking powder, and chocolate and mix all together. In your hands roll balls of dough (approx. walnut size) before placing them on an baking tin dip your cookies in white sugar. Bake for 12 minutes - even if you think it is not enough, believe me it is! Leave the cookies to cool down and bite in!!!!!!  


Sunday 27 October 2013

Original Italian Amaretti


Unfortunately those small peaces of pleasure and not made by me, but there were so delicious that I had to share this recipe with you!! Those Amaretti are amazing, their almond flavor and soft texture are just perfect for any occasion! It is really hard to resist...

Ingredients:
  • 400 g already grounded almonds. (if you can't find them you can ground them in a mixer) 
  • 1 teaspoon of bitter almond essence - optionally
  • 400 g sugar
  • 4 egg whites fresh
  • zest from 1 lemon
  • 1 teaspoon of vanilla extract or 1 package of vanilla sugar (16g)
Preparation:

Preheat the oven to 160ºC.  
Poor the almonds into a large mixing bowl add 300g of sugar, lemon zest and vanilla and almond extract, mix everything together. 
In a separate mixing bowl beat the egg whites until you will get a white delicate foam. Gently mix the almonds with the foam until all the ingredients combine. Now using your hands you should be able to form small balls, approx. as large as walnuts. Dip every ball in the remaining sugar and place on the baking tin previously lined with baking paper. Don't put the amaretti too close to each other because they will stick. 
Now put your amaretti to the oven and bake for about 15 min. The amaretti will be ready when you notice small cracks on the surface of every amaretti. 

Buon Appetito!!! 


Friday 18 October 2013

Vanilla meringue cheesecake


I never was a big fan of meringue but I tried this cheesecake last week and I have to admit I changed my mind about meringue toppings :) I really liked the soft and fluffy finish! Will come back soon to this recipe! 

Ingredients:

For the shortcrust base, take the recipe form here: My mum' apple pie

For the cheesecake: 
  • 6 yolks 
  • 1 kg cream cheese (you can use a full "quark"or ricotta)
  • 250g sugar
  • 1 package vanilla sugar (16g)
  • 200 ml cream (doesn't have to be the a double cream, you can use sour cream) 
For the meringue:
  • 6 egg whites
  • 110g sugar

Preparation:

For the shortcrust bottom please follow the steps from the link above. 
Preheat the oven to 180ºC. For the cheesecake. In a food processor whisk yolks with sugar until pale, add the cheese and milk and keep whisking until all the ingredients combine. Pour the cheese mixture into your cool shortcrust bottom. And put into the oven for approx. 50 minutes. Whisk the egg whites with sugar until you get a nice, white foam. Pour the foam on your cheesecake and keep baking for another 10-15 minutes until the meringue will get a nice gold color. Yummie!!!!!!!


Sunday 13 October 2013

Very easy cheesecake


This cheesecake is one of my favorites because it is very easy to make you just can't make anything wrong and it is simply delicious! It's fluffy texture and vanilla flavor will just make you want to repeat it! The best thing about this cheesecake is that it is low in calories because I am using a low fat cheese, no mascarpone or cream is needed to make it taste so good! Try and let me know if you liked it?

Ingredients:

For the bottom:
  • 300g cookies (I use Digestives but you can use butter biscuits or any others that you like)
  • 60g dark chocolate - optional
  • 50g butter
This time I also added a handful of chopped almonds but this is totally up to you...

(to make the cheesecake even more "light" you can skip the biscuit bottom and just prepare a plain cheesecake)

For the cake:
  • 1kg of low fat or semi fat cheese, I use the low fat "quark"
  • 6 eggs
  • 300 g sugar
  • 2 instant vanilla puddings
  • 1 package of vanilla sugar (16g) or a teaspoon of vanilla essence
Preparation:

Preheat your oven to 175ºC and prepare a 22-25cm round tin.
For the cookies bottom. Crumble the cookies, add melted chocolate and melted butter and mix everything together. Pour your cookies mixture and with a spoon or with you opened hand press on the cookies until you get a flat surface. 

For the cheesecake. Separate the yolks from the eggwhites in two seperate mixing bowls. Add sugar and vanilla sugar to the yolks and whisk until pale. Little by little start adding the quark and keep whisking untill all ingredients combine. When you are finish with the quark add the instant puddings and whisk again. Now take the bowl with the egg whites and whisk until you get a soft white foam. Gently combine the foam with the quark mixture and pour into the tin. Bake first 15 min in 180ºC and then 60min in 150ºC . If you notice that during baking the cheesecake gets a dark color just put down the temperature to 120ºC and bake additional 10-15min. 
Switch off the owen and leave the cake inside for about 30min then take out too cool down completely. After that you just have to enjoy it :) 


Thursday 10 October 2013

Extreme chocolate mousse cake


If you are a real chocolate lover you have to try this cake! It is a must!! But you have to be careful because it is highly addictive! 

Ingredients:

For the dough:
  • 60g softened butter
  • 3 eggs
  • 120g sugar
  • 60g flour
  • 50g grounded walnuts
  • 60g dark cocoa
  • 1/2 baking powder
For the chocolate mousse:

  • 150 g sugar
  • 3 whole eggs + 3 yolks
  • 1 spoon cocoa 
  • 200 ml fat cream
  • 100 g butter
  • 250 g dark chocolate min 70% of cocoa + 50 g for the decoration
Preparation:

For the dough. Preheat your oven to 180ºC and prepare 22cm round tin. 
Beat the yolks and the sugars together either in the food processor, or in a bowl with a whisk, until pale, add butter and whisk again. Add flour and baking powder, cocoa and whisk until combined. Add the walnuts and whisk it all again.
In a separate bowl whisk the egg whites with a pinch of salt until they form soft white foam peaks. Now take your cocoa mixture and gently combine it with your white foam. Pour the mixture into the cake tin and bake around 35 minutes. You can check to see that it's ready by sticking a cocktail stick into the centre of the cake. It should come out clean and not sticky, if it is still sticky just leave it in the oven for a couple of more minutes.
For the mousse. Take a metal mixing bowl and pour in 100g sugar, add 6 yolks, cocoa and the cream. Put the bowl on a pot with boiling water and start whisking everything until the mixture gets sticky or warm, be careful not to heat it too much because you will get chocolate scrambled eggs :) When the mixture is ready remove it from the pot and add  250g of chopped chocolate and mix until it melts completely. If the mixture cools down and you have problems with melting the chocolate put the bowl back on the pot with the boiling water in order to warm it up which will help the chocolate to melt. In a separate bowl whisk the egg whites with the remaining sugar until you get a soft white foam. Gently combine the foam with the chocolate mixture and pour the mousse directly on your chocolate dough. For the decoration you can melt the remaining 50g of chocolate and pour it on a plane surface (you can use a tin or a plate) wait until it congeals and using a knife scratch the chocolate forming small chocolate flakes. You can decorate your cake as you want but I like to put the flakes in the centre of the mousse. Next put your cake into the fridge for at least 4-5 hours but preferably for the whole night. 
Dip the knife in hot water each time you cut a peace, this will prevent the mousse from sticking to the knife. 

Enjoy!!!