Showing posts with label Cookies. Show all posts

Sunday 15 November 2015

Little Pilots - Lemon Cookies


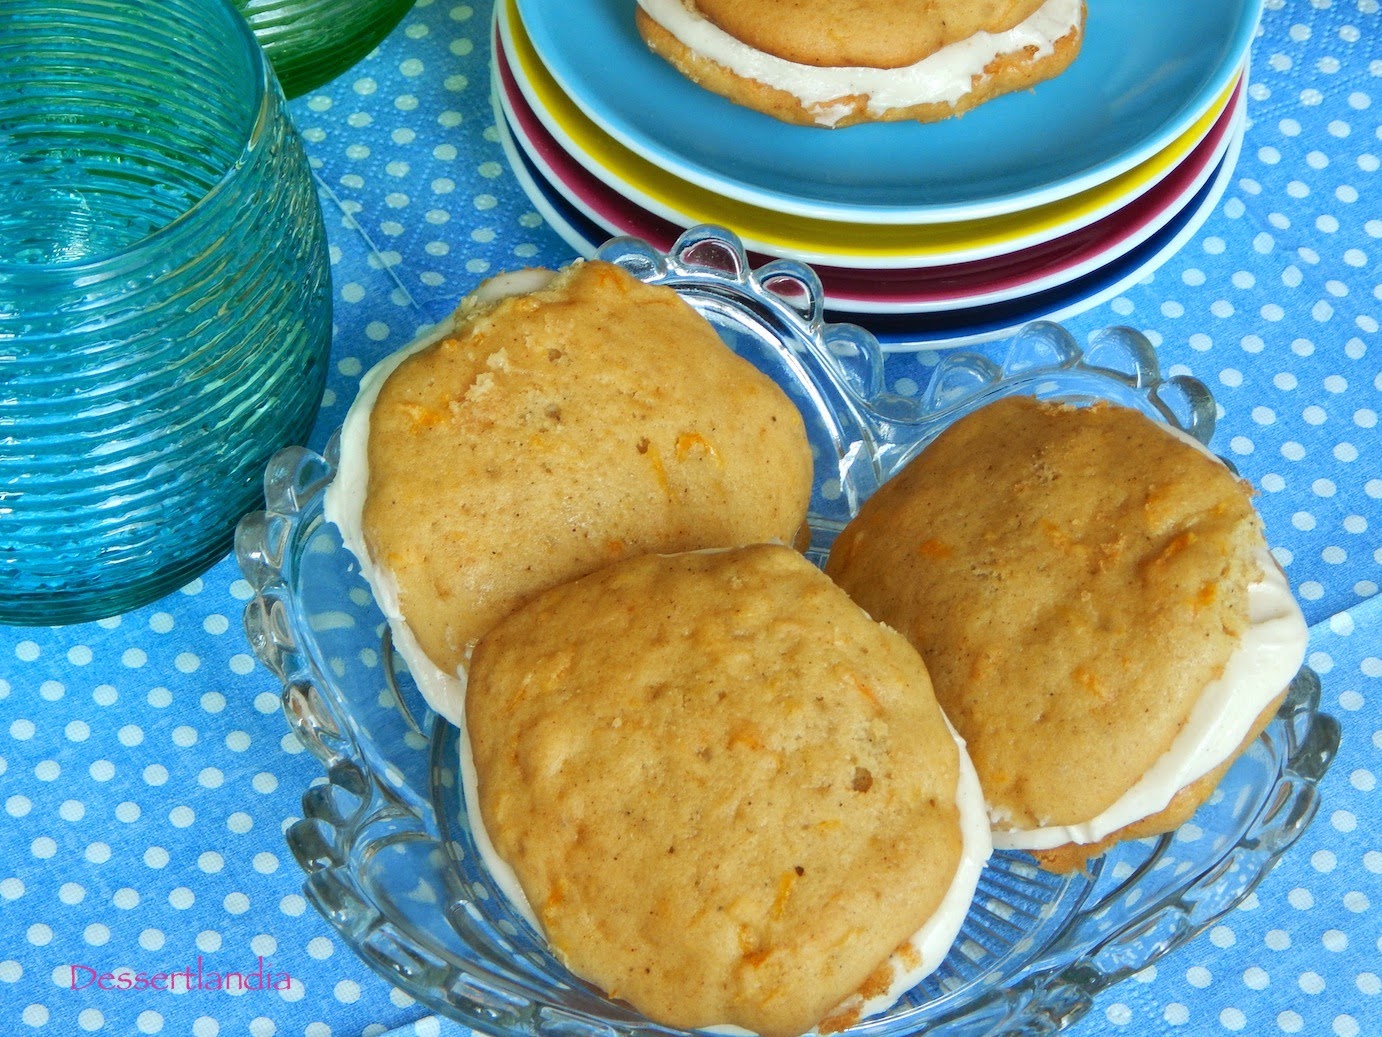
Oh boy!! I am totally in a cookie mood!! But you know what?? I looove it!! Just look at this little pilots they are so cute! And the planes so colorful and cheerful! I just want to fasten my seat belt, sit back and relax and fly away!
The cookies are covered with royal icing which I love to work with, it gives you so many possibilities to play with and decorate! You can conjure any shape and color you wish. Just perfect for cookie decorating! Don't be scared, take a piping bag and swirl on your favorite cookie :-)

Ingredients:
Ingredients:
makes approx. 25 medium cookies:
  • 200g butter
  • 200g brown sugar 
  • 1 egg
  • 400g flour
  • finely grated zest of 1 orange
  • edible food colorings - optional
  • Royal Icing from HERE.

Cookies: Preheat the oven at 180C. 
In a bowl of an electric mixer beet the butter and sugar together until creamy and fluffy. Ad the egg and mix until all combines. Add the lemon zest and mix again. Now add the flour and mix until all ingredients come together. Take your dough out of the bowl and cover with clingfilm and refrigerate for 30min.
Take your dough out of the fridge, sprinkle some flour on the work surface and roll out the cookie dough to about 5mm thick. 
I didn't have a cookie cutter in a shape of a pilot so I had to cut it out of carton and then used it as a transfer on my dough. But don't worry you can use any cookie cutter you wish!  Once you have cut all your shapes place your cookies on baking trays lines with baking paper. 

Bake the cookies for about 12-15min, depending on their size or until they get a nice golden color. 

Leave them to cool down completely before decorating with royal icing or storing.
For decorating my cookies I have colored my royal icing with edible gel colors. For piping I have used royal icing flooding consistency and soft peak consistency for the edges. 
Once the cookies are iced leave them for at least 8h for the royal icing to set.


Sunday 1 November 2015

Strawberry Sugar Cookies


I know you all are still in the Halloween mood but a little baby girl is turning 1 today and she didn't want to celebrate her first birthday with all those monsters and witches running outside! That is why strawberry sounded so joyful and fresh just perfect for this little cutie! 
You can see that I am using a basic recipe for my cookies and when decorated with royal icing they can transform in any sweet and beautiful cookie you want! Just use your imagination and don't be afraid of royal icing! 


Ingredients:
makes approx. 25 medium cookies:
  • 200g butter
  • 200g brown sugar 
  • 1 egg
  • 400g flour
  • 1 tsp of vanilla extract or 1 package of vanilla sugar (15g)
  • edible food colorings - optional
  • Royal Icing from HERE.

Preparation:

Cookies: Preheat the oven at 180C. 
In a bowl of an electric mixer beet the butter and sugar together until creamy and fluffy. Ad the egg, vanilla extract and mix until all combines. Now add the flour, cinnamon and mix until all ingredients come together. Take your dough out of the bowl and cover with clingfilm and refrigerate for 30min.
Take your dough out of the fridge, sprinkle some flour on the work surface and roll out the cookie dough to about 5mm thick. 
Using cookie cutters cut your cookie shapes and place them on baking trays lines with baking paper. 

Bake the cookies for about 12-15min, depending on their size or until they get a nice golden color. 

Leave them to cool down completely before decorating with royal icing or storing.
For the background of my cookies I used royal icing flooding consistency and soft peak consistency for the edges. Once the cookies are iced leave them for at least 8h for the royal icing to set. Once they royal icing had set paint the strawberries with gel colorings always using a dry brush. 


Sunday 11 October 2015

Orange Cinnamon Halloween Cookies


Halloween is just around the corner so you better hurry up and prepare your treat list!! And if you like fall flavors this cookies are just perfect for you. They are so tasteful and aromatic they will make your entire house smell like sweet orange and cinnamon. I tell you once they are done it will be very hard to resist! And if this explosion of aromas inspires you why not painting them? That's how I felt I had to do. So I quickly whisked my royal icing took my favorites brushes and started painting :) Hope you like the result!!

Ingredients: 
makes approx. 25 medium cookies:
  • 200g butter
  • 200g brown sugar 
  • 1 egg
  • 400g flour
  • finely grated zest of 1 orange
  • 2 tsp cinnamon

The recipe for the Royal Icing is here.

Preparation:

Cookies: Preheat the oven at 180C. 
In a bowl of an electric mixer beet the butter and sugar together until creamy and fluffy. Ad the egg mix until all combines. Add the orange zest and mix again. Now add the flour, cinnamon and mix until all ingredients come together. Take your dough out of the bowl and cover with clingfilm and refrigerate for 30min.
Take your dough out of the fridge, sprinkle some flour on the work surface and roll out the cookie dough to about 5mm thick. 
Using cookie cutters cut your cookie shapes and place them on baking trays lines with baking paper. 

Bake the cookies for about 12-15min, depending on their size or until they get a nice golden color. 

Leave them to cool down completely before decorating with royal icing or storing.
For the background of my cookies I used royal icing flooding consistency. Once the cookies are iced leave them for at least 8h for the royal icing to set. 

I have painted my cookies using always a dry brush and edible food colorings in gel. 


Enjoooooy!!!! 


Boooooooo…….


Wednesday 1 April 2015

Easter Cookies!


Hurray!! Its Easter!! I was really looking forward to decorate this cookies! I loved it! And I think they came out sweet :) Easter brings spring which means the days are becoming longer and finally we get some more sun! So I really was happy to use this joyful spring colors! Try it and have fun and Happy Easter!!!


Ingredients:
For the cookies: 
makes 10-15 large or 25-30 medium

  • 250g butter
  • 250g sugar
  • 1 egg (if you are not planning to do royal icing use 2 eggs)
  • 1 yolk (keep the egg white for your royal icing)
  • 1 package of vanilla sugar (16g)
  • 400g flour
For the Royal Icing:
  • 1 egg white
  • 250g powder sugar
  • 1 tsp vanilla extract - optional
  • food coloring - 
Preparation:
For the cookies: In a bowl of an electric mixer beet the butter and sugars together until creamy and fluffy. Ad the egg and the yolk and mix until all combines. Now add the flour in few stages and mix until all ingredients come together. Take your dough out of the bowl and cover with clingfilm and refrigerate at least for 30min.
Take your dough out of the fridge, sprinkle some flour on the work surface and roll out the cookie dough to about 5mm thick. 
Using cookie cutters cut your cookie shapes and place them on baking trays lines with baking paper. Return to the refrigerator to rest again for at least 30 min. 
Preheat the oven at 180C for about 10min. 
Bake the cookies for about 15min, depending on their size or until they get a nice golden brown color. 
Leave them to cool down completely before decorating them with royal icing or storing them. 
For the royal icing: Sift the powder sugar into a mixing bowl of an electric mixer, add the egg white and mix together for about 20min. Until the icing has reached a stiff-peak consistency (which is what you would need for sticking on decorations and gluing cakes together). We will need two consistencies stiff-peak and flooding consistency. Once you are happy with your icing consistency color your icing using eatable food colorings. Pour the icing into the piping bags and start from outlining around the edge of each cookie. Then with the same icing flood inside the outlines on the cookies. Leave for 8 hours to set. Once the icing is hard you can start with your baskets>> here you can find a nice tutorial on how to do the Easter basket cookies! Enjoy!!


Here some variations :) 


Wednesday 11 February 2015

Valentine's Day Cookies


So is it true you also can't wait for Valentine's Day? I am here in a baking and decorating mood! I think cookies can be a perfect sweet gift for the one you love! I think they look so wonderful, so much in love and of course the taste is also delicious!
Just be creative Valentine's Day is only once a year <3

Ingredients:
For the cookies: 
makes 10-15 large or 25-30 medium

  • 250g butter
  • 250g sugar
  • 1 egg (if you are not planning to do royal icing use 2 eggs)
  • 1 yolk (keep the egg white for your royal icing)
  • 1 package of vanilla sugar (16g)
  • 400g flour
For the Royal Icing:
  • 1 egg white
  • 250g powder sugar
  • 1 tsp vanilla extract - optional
  • food coloring - I used red and pink
Preparation:
For the cookies: In a bowl of an electric mixer beet the butter and sugars together until creamy and fluffy. Ad the egg and the yolk and mix until all combines. Now add the flour in few stages and mix until all ingredients come together. Take your dough out of the bowl and cover with clingfilm and refrigerate at least for 30min.
Take your dough out of the fridge, sprinkle some flour on the work surface and roll out the cookie dough to about 5mm thick. 
Using cookie cutters cut your cookie shapes and place them on baking trays lines with baking paper. Return to the refrigerator to rest again for at least 30 min. 
Preheat the oven at 180C for about 10min. 
Bake the cookies for about 15min, depending on their size or until they get a nice golden brown color. 
Leave them to cool down completely before decorating them with royal icing or storing them. 
For the royal icing: Sift the powder sugar into a mixing bowl of an electric mixer, add the egg white and mix together for about 10min. Until the icing has reached a stiff-peak consistency (which is what you would need for sticking on decorations and gluing cakes together). But we now need a thinner consistency of icing in order to be able to create this beautiful roses. You will have to add some water to the icing but do this step by step. To get the best consistency I have used the 10 seconds rule - you can find may tutorials on royal icing. Once you are happy with your icing consistency color your icing using eatable food colorings. Pour the icing into the piping bags and start from outlining around the edge of each cookie. Then with the same icing flood inside the outlines on the cookies. Immediately before the icing starts to dry put some dots on the icing and with a toothpick make some swirls or zig-zags to get different designs. Here you can find a nice tutorial on how to do the Royal Icing Hearts Hope you enjoyed!!! 


Sunday 5 October 2014

Royal Icing Rose Cookies


My nice who is probably my biggest fan complained that I have been lazy and didn't bake anything new recently! Hmm…so no excuses I had to catch up! And as I am not a royal icing expert I thought this was a great opportunity to practice my skills! That is how this beautiful rose cookies have been created! I used the wet-on-wet technique with is very easy to do even if you are a beginner. You can create many patterns from marbling cookies to this beautiful roses! Hope you like them :)

Ingredients:
For the cookies: 
makes 10-15 large or 25-30 medium
  • 250g butter
  • 250g sugar
  • 1 egg (if you are not planning to do royal icing use 2 eggs)
  • 1 yolk (keep the egg white for your royal icing)
  • 1 package of vanilla sugar (16g)
  • 400g flour
For the Royal Icing:
  • 1 egg white
  • 250g powder sugar
  • vanilla extract - optional
  • food coloring
Preparation:
For the cookies: In a bowl of an electric mixer beet the butter and sugars together until creamy and fluffy. Ad the egg and the yolk and mix until all combines. Now add the flour in few stages and mix until all ingredients come together. Take your dough out of the bowl and cover with clingfilm and refrigerate at least for 30min.
Take your dough out of the fridge, sprinkle some flour on the work surface and roll out the cookie dough to about 5mm thick. 
Using cookie cutters cut your cookie shapes and place them on baking trays lines with baking paper. Return to the refrigerator to rest again for at least 30 min. 
Preheat the oven at 180C for about 10min. 
Bake the cookies for about 15min, depending on their size or until they get a nice golden brown color. 
Leave them to cool down completely before decorating them with royal icing or storing them. 
For the royal icing: Sift the powder sugar into a mixing bowl of an electric mixer, add the egg white and mix together for about 10min. Until the icing has reached a stiff-peak consistency (which is what you would need for sticking on decorations and gluing cakes together). But we now need a thinner consistency of icing in order to be able to create this beautiful roses. You will have to add some water to the icing but do this step by step. To get the best consistency I have used the 10 seconds rule - you can find may tutorials on royal icing. Once you are happy with your icing consistency color your icing using eatable food colorings. Pour the icing into the piping bags and start from outlining around the edge of each cookie - I used white icing. Then with the same icing flood inside the outlines on the cookies. Immediately before the icing starts to dry put some dots on the icing and with a toothpick make some swirls or zig-zags to get different designs. Hope you enjoyed!!! 


Sunday 24 August 2014

Carrot Cake Whoopie-Pies


I have never baked any whoopie-pies before but heard so many delicious comments about them that I had to try myself! I have chosen this carrot version so everybody who loves carrot cake will definitely go crazy for this small treats! They are moist, soft, aromatic and the marshmallow filling makes them to die for!!!! You must try!!

Ingredients:
makes 8-10 pieces
  • 1 egg
  • 150g sugar
  • 2 packages of vanilla sugar (16g each)
  • 125ml yoghurt
  • 25ml milk
  • 75g butter, softened
  • 275g flour
  • 1/2 teaspoon cinnamon
  • 1/2 teaspoon ginger
  • 1/2 teaspoon nutmeg
  • 1/4 teaspoon back powder
  • 3/4 teaspoon baking soda
  • 100g grated carrot
Filling:
  • 170g soft butter
  • 280g icing sugar
  • 1/2 teaspoon cinnamon
  • 220g marshmallow fluff
Preparation:
In a mixing bowl mix together, egg, sugar and vanilla sugar. When all the ingredients combine add yoghurt and milk and whisk all together, add the soft butter and whisk until all combines. 
To another mixing bowl pour flour, cinnamon, nutmeg and ginger, backing powder and backing soda and whisk all together. Then pour a half of the flour mixture into the egg mixture and combine all ingredients, next pour the rest of the flour mixture and whisk again until all combines. Take the grated carrot into your hands and press out the juice, next pour the carrot into the paste and whisk to combine.
Now put the mixture into the fridge for approx 30min to rest.
Preheat the owen to 175°C.
Take out from the fridge and with a spoon form 16-20 round small heaps (approx 3-5cm diameter) keeping 2-3cm distance from each other. Bake for 10-13 minutes until the cakes get a nice golden color. 
In the mean time prepare the filling:  In a mixing bowl mix butter, icing sugar, cinnamon until they get fluffy, now add the marshmallow fluff and whisk until everything combines. Put the filling into the fridge for the next 30minutes. 
When your pies are cool spread one spoon of the filling on one half of the pies, take the other half and press gently together. Enjoy!!!!! 


Monday 17 February 2014

Peanut Butter Chocolate Chunk Cookie Bars


OMG!!!!! They are just AMAZING!!!! Crazy how delicious these peanut butter bars are!! I really had to struggle hard not to eat all of them by myself!! They are super easy to make, all the taste you love from the peanut cookies remains the same just the method takes half of the time!! The chocolate makes a perfect combination to the saltish peanut butter, I think I will never stop to combine those two great ingredients!! You really have to try!!! 
Recipe adapted from: Averie Cooks

Ingredients:

  • 125g butter, melted 
  • 1 large egg
  • 150 g light brown sugar
  • 50g white sugar
  • 1 tablespoon vanilla extract
  • 200g creamy peanut butter
  • 160g all purpose flour
  • 1/2 teaspoon baking soda
  • pinch salt, optional and to taste
  • 150g dark or semi-sweet chocolate, roughly chopped 
Preparation: 
Preheat the oven to 180°C  Line an 20cm x 20cm baking pan with baking paper. 
Melt the butter and cool it down a bit. Add the egg, sugars, vanilla, and stir to combine. Stir in the peanut butter. Add the flour, baking soda, optional salt and stir until just incorporated. Stir in chocolate. Turn batter out into prepared pan, smoothing it lightly with a spatula.(The dough comes out quite dense so don't get afraid that something went wrong, because it didn't !!) Bake for 18 to 22 minutes, or until center is just set and golden.
Take the bars out and leave to cool in pan for at least 30 minutes before slicing and serving. Store extra bars in an airtight container at room temperature for up to 1 week, or in the freezer for up to 3 months.


Monday 27 January 2014

Valentines vanilla cookies


Valentines is just around the corner so why not making this lovely day even more sweet!! This vanilla cookies are very simple to make and the rich vanilla flavor is just amazing! I am sure you and your Valentine will just love them!!!

Ingredients:

  • 220g flour
  • 150g butter
  • 100g sugar
  • 2 eggs
  • 2 pkg vanilla pudding (apporx 40g each)
  • 1/2 tsp baking powder
  • 1 pkg vanilla sugar or 2 tsp vanilla essence
  • pinch of salt
  • red food coloring - optional
Preparation:

Preheat your oven to 180ºC. You can make your pastry by hand, or simply pulse all the ingredients in a food processor. If making by hand, sieve the flour with the baking powder and vanilla pudding, sugars into a large mixing bowl. Add chopped butter and mix with your hands until the mixture resembles breadcrumbs. Add the eggs and gently work it together until you have a ball of pastry dough. If you want you can now divide your dough into 2 pieces.  Put the half of the dough into a separate mixing bowl and add the red food coloring and whisk all together. 
Now you can just use a spoon to form your cookies and put them directly on the baking sheet and put into the owen. 
But if you would like to cut out some hearts, like I did, sprinkle a little flour over the pastry, then wrap it in a cling film and pop it into the fridge to rest for 0.5hour. When the pastry is cool it is much easier to roll it and cut it out. 
Take out the dough from the fridge and on a floured worksurface, roll dough to 1/2 cm thickness and cut with a heart-shaped cookie cutter. 
Place your hearts on the baking tin and bake for 10 minutes. You can use any shape you like they will still be delicious!

*Recipe adapted from  Sweet Bella Roos


Idea: You can also put some of your favorite jam in between and make a sweet sandwich :)


Sunday 5 January 2014

Caramel filled toffee cookies


Every time it is rainy and cold outside I fancy something sweet, something special which would give some flavor to this sad day! What else could cheer me up if not my fav caramel cookies!!! They are simply delicious!!! I am a big caramel lover and I love to enjoy them with a hot cup of coffee...although hot chocolate would be even better!
Recipe inspired by: Anna

Ingredients:

For approx. large 18 cookies
  • 120g all-purpose flour
  • 2 packages of toffee instant pudding (40g each) if you don't have toffee pudding you can replace it with a vanilla pudding or with the same about of flour 
  • 2 spoons of unsweetened cocoa powder
  • 1/2 teaspoon baking soda
  • 100g white sugar
  • 100g light brown sugar
  • 100g butter, room temperature
  • 1 teaspoon vanilla extract
  • 1 large egg
  • 6 large caramel candies (the amount of candies depend how big they are, mine were quote large so I have divided each candies in 3 peaces)
  • 2 spoons white sugar (for rolling)
Preparation:

Preheat the oven to 200ºC and line a cookie pan with baking paper and set aside. 
Place butter in large mixing bowl and beat with a mixer for a few seconds. Add both sugars, egg and vanilla and mix all the ingredients until combined. Add all the dry ingredients: flour, cocoa and baking soda, baking powder and combine everything together.  
In your hands roll balls of dough. Place your caramel candy in the center of the dough and cover with more dough and roll again into a ball. Before placing your cookies on an baking tin dip them in white sugar. Place the cookies on the prepared baking tin, I was placing only 6 balls of dough because they will at least double their size :)
Bake for 9-10minutes, cool down for a few minutes and transfer onto a cooling rack.